Real-Time Parameter Commands
Real-Time Parameter Commands let you set up Animation Curves for volume & pitch based on real-time parameter changes that happen during the game, for multiple related sound effects.
Note: Real-Time Parameter Commands feature is only available in Master Audio 2024+.
Some examples of scenarios that Real-Time Parameter Commands would help you achieve are:
- A gunshot could crossfade between 2 or more sound effects based on distance from the Listener.
- A racing game can change the pitch and/or volume of the engine based on RPM.
- The pitch/volume of a sound effect can be automated over its lifetime started at the time the Command is invoked.
These are just a few easy to understand cases. The possibilities are virtually endless! Once the Parameters and RTPC curves have been defined by the sound designer in Master Audio, the game merely needs to update the value of the your Parameters while the game is being played. Master Audio will evaluate the RTPC curve(s) for the current value of the Parameter.
Note: Event Sounds can also set Parameter values and Invoke Parameter Commands for you without writing any code.
Parameter Management
For your Commands, you can use one of the built-in Parameters (which have square brackets around them in the dropdown) or create your own. If you create your own, you would be responsible for updating its value based on game events. The top section is where you create your own custom parameters. You will find the following options.
- Add Parameter: Click to create a new Parameter.
- Expand / Collapse All: Click to fully expand or collapse the Parameters.
- Gear (edit) icon: You can change the Parameter name by clicking the gear icon, typing the name, and clicking the disk (save) icon.
- Delete icon: Click to delete the Parameter.
- Min/Max Value: Here you can set the minimum and maximum value for your Parameter. Any attempts to set the Parameter at runtime to a value outside these values will instead use the min/max.
Parameter Commands
Create as many Parameter Commands as you want. You will find the following options.
- Add Parameter Command: Click to create a new Parameter Command.
- Expand / Collapse All: Click to fully expand or collapse the Parameter Commands.
For each Parameter Command, you will find the following options.
- Gear (edit) icon: You can change the Command name by clicking the gear icon, typing the name, and clicking the disk (save) icon.
- Delete icon: Click to delete the Command.
- Parameter: Select a Parameter whose real-time value will drive your curves in each Element in your Command. You can either select a Parameter you created, or from a list of built-in Parameters. Here's a list of the build-in ones and how they work.
- [Listener Distance]: The distance from the actor to the Audio Listener is used.
- [Frames Since Start]: The number of frames since entering Play Mode is used.
- [Seconds Since Start]: The number of seconds since entering Play Mode is used.
- [Seconds Since Command Invoke]: The number of seconds since the Command was invoked is used.
- [Times Command Invoked]: The number of times the Command was invoked is used.
- Stop Cmd Out Of Range: If you check this box, Valid Range Min/Max fields will appear. When the selected Parameter's value falls outside the range you specify there, the Command will be Stopped. If the value is outside the range when the Command is invoked, the Command will be aborted instead.
- Curve X Min/Max: If you have selected one of the built-in Parameters, these fields will appear. They control the minimum and maximum X axis values shown on the curve fields in each Element.
Parameter Command Elements
Each Parameter Command is made up of one or more elements. The elements each contain one or more Animation Curves respresenting something to change according to the value of selected Parameter. Without any Elements, a Command will not do anything. For each Element, you will find the following options.
- Gear (edit) Icon: You can change the Element name by clicking the gear icon, typing the name, and clicking the disk (save) icon.
- Delete icon: Click to delete the Element.
- Show Animation Curves: Defaults to checked. The various "Affect" checkbox sections will appear below this when it is checked.
-
Affect Volume: Turn this on to affect volume of the Element's Sound Group according to the value of selected Parameter. If you do not select either "Affect Volume" or "Affect Pitch", the Parameter's value will have no effect on sound played by the Command. More fields will appear when checked.
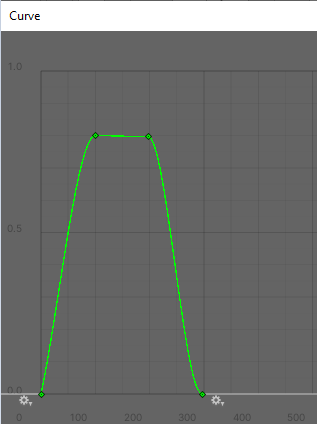
- Volume Curve: Clicking this opens a window to set the Volume's Curve, where Volume is the Y axis and the selected Parameter's value is the X axis. For example, the curve below fades in from 0 to 0.8 volume over the Parameter range of 0-100, then fades out over the range of 200-300.
- Fade In/Out Fields: Clicking this shows additional fields you can use to set the curve using numeric fields.
- Fade In Param Value Start/End: These 2 fields will set a fade in from 0 up to the Max Volume below in the Volume Curve, when you click the "Set Curve To Fade In/Out Fields" button.
- Fade Out Param Value Start/End: These 2 fields will set a fade out from Max Volume to 0, when you click the "Set Curve To Fade In/Out Fields" button.
- Max Volume: This will set the max volume the curve uses on the Fade In, when you click the "Set Curve To Fade In/Out Fields" button.
- Set Curve To Fade In/Out Fields: Click this button to use the fields above to create a Volume Curve.
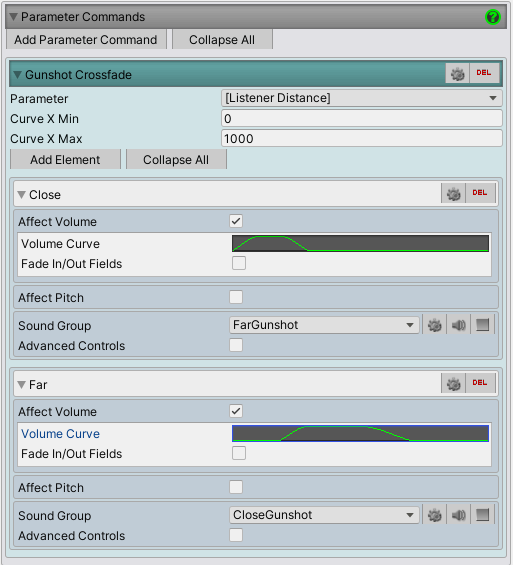
 You might use a curve for a different Element that fades in during the fade out of this element to crossfade into another sample, as below. See how the two Volume Curves overlap each other's fade zones.
-
Affect Pitch: Turn this on to affect pitch of the Element's Sound Group according to the value of selected Parameter.
- Pitch Curve: Clicking this opens a window to set the Pitch's Curve, where Pitch is the Y axis and the selected Parameter's value is the X axis.
-
Affect Low Pass Filter: Turn this on to affect the Low Pass Filter of the Element's Sound Group according to the value of selected Parameter.
- Low Pass Filter Curve: Clicking this opens a window to set the Low Pass Filter's Curve, where Cutoff Frequency is the Y axis and the selected Parameter's value is the X axis.
-
Affect High Pass Filter: Turn this on to affect the High Pass Filter of the Element's Sound Group according to the value of selected Parameter.
- Low High Filter Curve: Clicking this opens a window to set the High Pass Filter's Curve, where Cutoff Frequency is the Y axis and the selected Parameter's value is the X axis.
- Sound Group: Select a Sound Group to play, whose pitch/volume will be affected by the selected Parameter's value during the lifetime of the Command. If you do not select a Sound Group, the Command will do nothing.
- Advanced Controls: Check this to show more controls.
- Variation Mode: Select either "Play Random" (the default), or "Play Specific".
- Variation Name: Only visible if "Play Specific" is selected above. Specify the name of the Variation to play here.
- Sound Spawn Mode: Choose either "Attach To Caller" (the default) or "Caller Location". Attach To Caller will follow the actor, whereas Caller Location will only use its initial location.
- Override Pitch: Check this to specify a specific pitch on the field that will appear underneath, instead of using the Variation's set pitch.
- Adjust Audio Range: If you check this box, you will see a mesh sphere gizmo in Scene View showing the Min / Max distance of the Audio Source for the Sound Group, which you can adjust here with Min/Max Distance fields.
- Delay Sound (sec): Optinally specify a delay before playing the Sound Group.